

Kanban: Limit Work in Progress (WiP)

Have you ever had to accomplish multiple tasks and decided to chip bits and pieces from each one, hoping to complete them all simultaneously? Did you feel like you were not accomplishing anything with this approach? Did it feel like it was taking you longer to complete the tasks?
How about that time when you were in the middle of working on a task, and your boss told you, “We have an urgent task you need to work on”? You then abandon the initial task handed to you and start working on the new one. The next day comes, and the seemingly urgent tasks keep piling up. You end up not completing anything. Worse, you end up stressed out.
Let’s understand the reality. Our brains are wired to work on one task at a time. Despite our best efforts to multi-task, we often find ourselves failing at it. This is what we call task switching-the act of changing from one task to another in rapid succession. It not only slows down our momentum but also significantly lengthens the time we spend on a task.
But here’s the good news. Within a Kanban system, this frustrating practice can be effectively avoided through the implementation of Kanban WiP Limits. These limits can bring a sense of order and control to your work, allowing you to focus on one task at a time and significantly improving your productivity.
What are Kanban WiP Limits?
WiP stands for Work In Progress. In Kanban, WiP limits represent the number of tasks being worked on by an individual or team at one time. WiP limits are indicated in a Kanban board and can be set for an entire Kanban process or per step. Implementing Kanban WiP limits is an essential practice in Kanban so be sure to look for them when choosing Kanban software for your needs. This allows teams to stabilize work and increase predictability which are crucial elements for establishing a pull-based system. The WiP limits are identified by the team who owns the workflow.
Why We Need to Set WiP Limits
Setting WiP limits is a key property in Kanban for a number of reasons. Kanban WiP limits:
- Teach teams to focus on getting things done.
- Prevent tasks from accumulating at any step in the process.
- Allow teams to know their true capacity.
- Expose blockers, bottlenecks, and inefficiencies.
- Help prevent teams from being overburdened or lax.
Setting WiP limits enforces teams to only work on what they can. This helps in managing the flow of work through a Kanban system.
How the Kanban WiP limits are Set
When starting your Kanban practice, your WiP limits would more often be a guesstimate. You can try setting the limit to be the same number of members within your team for each process step.
While there is no hard rule in setting Kanban WiP limits, the basic idea is for each individual to work on one task at a time. Don’t stress yourself too much when setting initial WiP limits. Since you’re just starting your Kanban adoption, the initial limit you set may not accurately represent your team capacity and that’s fine. The more you do your work and religiously follow your WiP limits the better you can derive what limit works best for your team. We recommend that you keep track of your team’s performance metrics so you can get the WiP limit that reflects your team’s capacity.
Now, which data or metrics will help you calculate your WiP limits?
In our Value Stream Mapping article, we talked about value-adding and non-value adding process steps. Knowing these will help you know the time your team spends on value-adding and non-value adding activities. Once you know them, you will then be able to calculate your process efficiency. You will then use your process efficiency to calculate your WiP limits.
To better illustrate, let’s take this process for example:
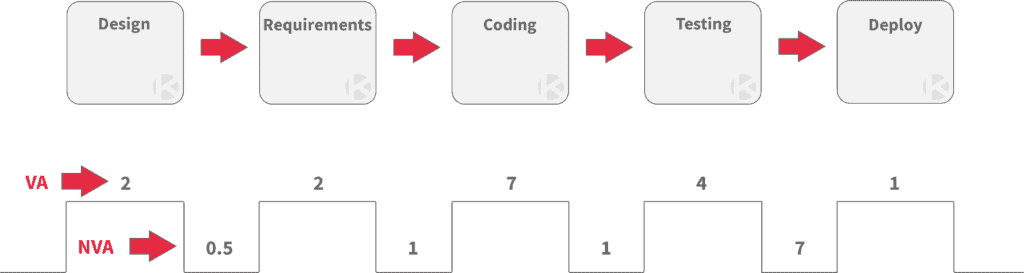
Given your Value Stream Map, plot the value-adding (VA) and non value-adding (NVA) times across your process. For this example, let’s assume the unit of measure is in days.
Now, take the sum of your VA and NVA times and use that to calculate the process efficiency.
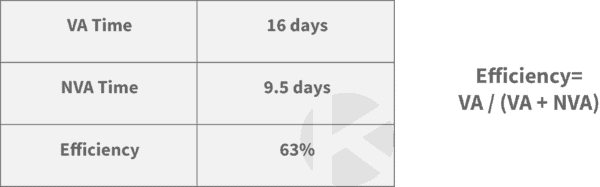
Efficiency is simply the VA time over the total time it takes for your whole process to finish or the sum of your VA and NVA time.
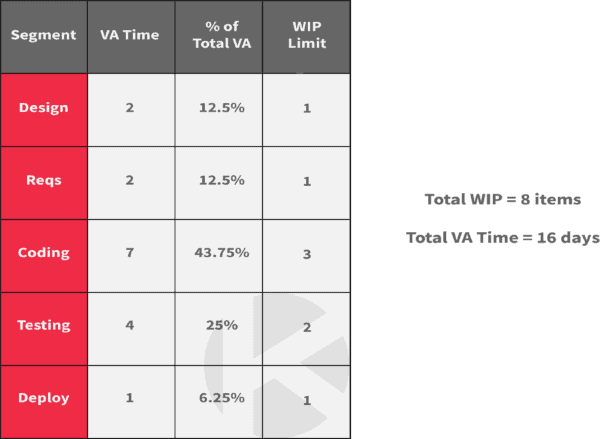
Now that you know your process efficiency, you can now calculate your WiP limits. Let’s say for this example, your team is composed of 5 members. Your total WiP will then be equal to:

This represents the total number of items that should be within your entire Kanban system at one time.
To calculate for the WiP limits per process step, get the percentage of the VA time of each process step from the total VA time and multiply that to the total WiP.
Now, while this may seem like a more structured way to determine your Kanban WiP limit, it is still up to you to gauge whether or not the WiP limits you derive work best for your team. There are other ways to set your WiP limits. The simplest way to start is to put a WiP limit on the part of your process that’s incurring delays then work from there.
Regularly Reviewing Your Kanban WiP Limits
As you go on with your Kanban practice, your WiP limits will definitely change. This could be due to a lot of factors including:
- Workflow changes (e.g. new steps being added, steps being removed)
- Skills, knowledge, and expertise growth
- Change in team composition (e.g. members being added to or leaving from the team)
No matter the reason, it is important to regularly assess your team’s capacity. Set aside time to review Kanban WiP limits as a team. However, do not attempt to change your WiP limits so hastily when your team reaches it. Discuss first why it happened and assess if an adjustment is necessary. If the pattern becomes consistent, then it is clearly a signal that you need to adjust your WiP limit and should also push you to thoroughly assess inefficiencies in your process.


